Introduction
Others have used beads to represent the English alphabet in binary for making name bracelets to represent the encoding and decoding process (Code.org, ND). In this project, we walk participants through creating a beaded bracelet as a manipulative to demonstrate the computation behind some types of flow control in Python. The creation of the bracelet provides a tangible and visual analog of the invisible work occurring in the Python interpreter during if–elif–if statements and for/while loops, allowing the participant to understand the computational concepts involved. Specifically, we describe how to use inexpensive beads, thread, and a beading needle to create a three-bead spiral rope bracelet (Yang, 2020). We emphasize the differences and similarities between for and while statements with diagrams of the bead project steps that connect visuals, text instructions, and Python code, and provide worksheets for participants to translate their beading process into pseudocode. A simple stringing exercise demonstrating a while loop is offered for younger participants.
Based on our experience teaching beading classes, we strongly recommend you suggest that patrons who use reading glasses or magnifiers bring them! Providing bright task or natural lighting, and the option to use large beads, will make the project more accessible to a wider audience. Consider using a computer with a projector to show how the Python code examples execute, and potentially allow participants to collaborate in suggesting and running code alterations and variations inspired by experimentation with the beaded spirals (some starting points for such an exercise are suggested in the Appendix).
Teaching Computational Thinking
This project will be of particular interest to your library if you have or are interested in building a makerspace or coding programming at your library. It’s also great for an introductory computer science or programming class at a dedicated makerspace, or other third space. Beading is a craft that incorporates both kinesthetic and visual learning, and by incorporating physical objects with code, verbal representations of code, and repetition, it’s the kind of activity that strengthens the association between an object and learning code. This method works for all ages, but we also have a simplified recommendation for younger makers.
Simplified Lesson
A simplified version of the project can be done with just stringing beads in a given pattern (such as assigning colors to beads a and b, for an a, b, a, b repeat). We recommend pony beads or similar, yarn with a “tape” needle or stretchy elastic thread, and the following code:
Code Block 1: Simple while Loop for a Stringing Project
a_beads = 20
b_beads = 20
pattern_repeat = 1

while a_beads > 0 and b_beads > 0: #keep going until there are no beads left
    print("pattern repeat: ", pattern_repeat)
    print("a_bead")
    print("b_bead")
    a_beads -= 1 #take away 1 a_bead from a_beads
    b_beads -= 1 #take away 1 b_bead from b_beads
    pattern_repeat += 1 #add 1 to the total pattern repeat

print("Your a, b while loop pattern is complete.")
Code block 1 is appropriate for children around age ~10 in Python, or people who struggle with fine motor skills and want to try hands-on learning. This or another strung bead pattern can be translated to a block-based visual language such as MIT’s Scratch (ages 7+) or Scratch Jr (recommended for ages 5–7) (Bers & Resnik, 2015). If you’re a librarian looking for resources to add to your collection on teaching programming to children, we recommend:
- Bers & Resnick’s (2015): The official ScratchJr book: Help your kids learn to code
- Rusk & Massachusetts Institute of Technology (2017): Scratch Coding Cards: Creative Coding Activities for Kids
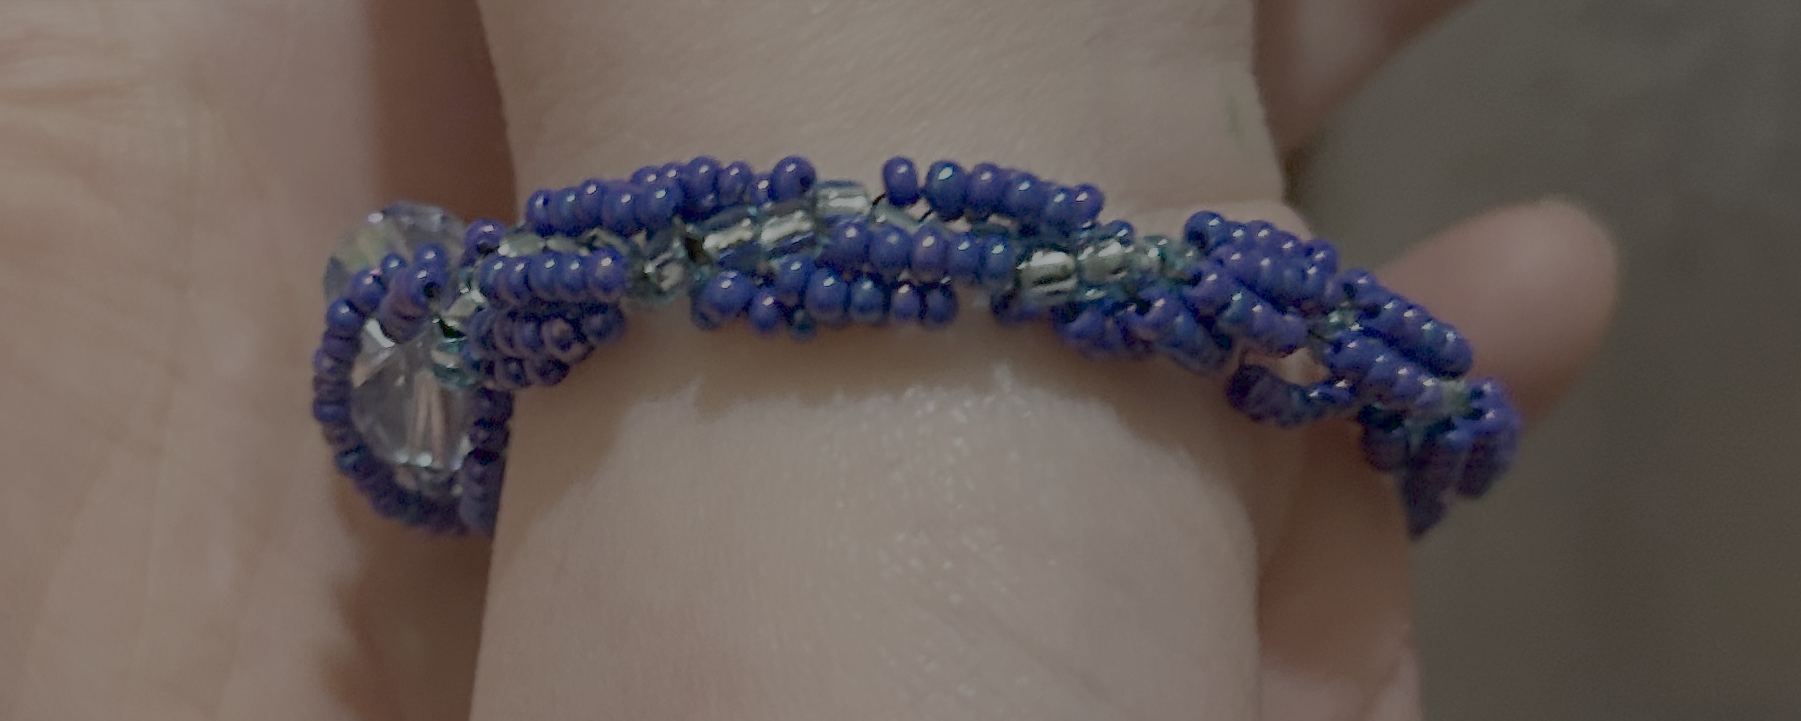
We found that children as young as seven years old were able to follow instructions for a spiral rope with a slightly modified bead size. Note: it was the first author’s seven-year-old who saw what her mom was doing and wanted to make one too (Figure 1). She’s also a fiend at making snowflakes swirl around in Scratch.
Figure 1: A Second Grader’s Spiral Bracelet
The Project, Resources, and Supplemental Readings
For ambitious and dexterous kiddos, crafty teens, and adults, we recommend the spiral bracelet pattern. The total cost per bracelet can be minimized by planning ahead and acquiring materials in bulk. At current prices at the time of writing, the low end for materials will be around $2.5–5 per person.
For supplemental readings on programming, we generally do not recommend purchasing instructional books for adults for two reasons: 1) code is a living language and is updated frequently, leaving the print materials out of date before long; and 2) many of the free resources online are better than an out-of-date print book. As of the creation of this article, this is what the first author uses in her Python course at the University of Missouri:
- Severance, C. (2016): Python for Everybody.
Project-oriented books that contain guidelines for creating a program or programs that have clearly defined outcomes are useful, as they give the opportunity to think through a problem and work it out, which can be done in most programming languages. A project-oriented book is one that provides one or more activity based projects for coding; these have a clear outcome and it’s obvious when they do and do not work. A free example hosted online is The Big Book of Small Python Projects by Al Sweigert (2021), which is also available in print.
Materials
Choosing materials and controlling costs
Seed bead prices vary depending on bead color, source, and whether they are purchased in bulk or small lots. Costs can be reduced by choosing seed beads without special color coatings and (potentially) by using button/loop clasps rather than commercial clasps such as lobster or spring clasps. The sky’s the limit on button costs, but they may also be acquired at a negligible per-button cost in bags sold by weight. Similarly, base metal findings such as lobster claw clasps can be purchased relatively inexpensively in bulk, but metal allergies are relatively common and should be kept in mind as a potential barrier.
Nylon beading thread (e.g. “Good Thread,” Nymo size B or D) or a bonded synthetic beading thread such as FireLine or WildFire (not monofilament fishing line, as it is prone to breakage and tangling) are good choices for this project. The latter may be a better choice for the longevity of button/loop closures as they are better able to withstand friction over time, but it is a pricier option (e.g. a spool of ~550 yds of Good Thread can be purchased for under $10, or ~2000 yds of size D Nymo around $25, while 125 yds of ~.005 bonded thread retails for approximately $35). Nylon beading thread can be prone to tangles, so it may be helpful to have beeswax or a synthetic thread conditioner on hand if it’s used.
Size 10 beading needles will work with both 11/0 and 8/0 seed beads. “Collapsible eye” style wire needles will also work and can be much easier to thread. Needle sizes are named similarly to bead sizes: the smaller the number, the larger the needle. A “short” needle will be about 1 inch (∼2.5 cm) long, and a “long” needle will be about 2 inches (∼5 cm) long; either length will work for this project, but shorter needles may be less prone to breaking.
Recommended seed bead types
For this project we recommend using “round” style Japanese or Czech seed beads (not the “cylinder”-style beads including Miyuki “Delicas” and Toho “Treasures”). The sizes typically available include 8/0, 10/0, and 11/0. The smaller the number before the “/0” the larger the size of the bead. Larger sizes, such as 8/0 or 6/0, may be easier for some patrons to work with.
Recommended bracelet and bead sizes
Appropriate bracelet sizes vary widely, but assuming average lengths of 5.5–9″ (including clasp) allows estimation of the materials needed to fit a fairly wide range of teen to adult patrons. A good rule is to make the bracelet a half inch shorter than the desired length, as the clasp will add at least that much more to any bracelet. Seed beads are generally sold by mass; while their weight depends on color and manufacturer, for size 11/0 (size 8/0) seed beads, 3–5 g (9–15 g) of outer beads and 1–2 g (3–5 g) core beads should be enough to create a 5–8.5″ length of spiral rope. Naturally, it is better to err on the side of too many beads on hand, rather than too few, especially since a button and loop clasp requires some additional beads.
Programming Vocabulary Used and Examples
The language used in programming is different from much of spoken English, having specialized meanings for words and symbols that you may already know in another context. Some important definitions used in the rest of the article follow:
- Comments: preceded by a # anywhere in the code, these are text that is not executed as part of the program and serve as clues to your future self. More detail is generally better than less.
- Variable: a user-named object (e.g. “a_bead”) that is used to store values
- Data type: the type of data that an object has (e.g. int, float, string, list, bool)
- Index: the place in which a piece of information resides inside an indexed construct like a list. By default, index values begin at 0.
Example: colors = [‘blue’, ‘yellow’, ‘red’, ‘green’]
In this list, the value at index 0 is the string ‘blue,’ and can be addressed as colors[0]; similarly, the value at index 2 (colors[2]) is the string ‘red’ - Flow control: the order in which statements, instructions, and/or function calls are evaluated and/or executed
- While loop: a loop that runs until a condition (see Table 3), which is checked on every iteration (time through the loop), is false
Example: While there are beads, keep looping until there are no more beads - For loop: a loop that runs a fixed number of times, most often, though not always, controlled by a range statement (see definition)
- Loop control statement: exactly what it sounds like, a statement that controls how a loop executes (or doesn’t), regardless of whether the loop’s standard condition for ending is met. For example, the break loop control statement can be used to exit a while loop before its condition is false
- Range: a built-in function that returns a sequence of numbers starting from 0 up to the number referenced in increments of 1
- White space (indentation): Python uses levels of indentation (i.e. number of spaces or tabs before a line of code) to indicate which blocks of code belong together. Thus, the interior code of a loop that follows a statement of its condition will all be indented to the same level, as will each condition in an if-else or if-elif-else statement
- Integrated Development Environment (IDE): a graphical software development interface for writing, testing, editing, and running code. Examples of free IDEs for Python include IDLE (included with the base Python installations from Python.org), PyCharm, and Jupyter Notebooks (Anaconda Python).
Table 1 includes some of the basic arithmetic operators used, in addition to parentheses, that form the basis of computational ability in Python. The first four, addition, subtraction, multiplication, and division, are the same as in basic arithmetic. The modulus is slightly different, and is more similar to the concept of long division with a remainder.
Table 1: Basic Python Arithmetic Operators
| Operator | Name | Read as/sounds like | Example |
|---|---|---|---|
| + | Addition | “Plus” | A + B |
| – | Subtraction | “Minus” | A – B |
| * | Multiplication | “Times” | A * B |
| / | Division | “Divided by” | A / B |
| % | Modulus | “Divided by with remainder” or “modulus” | A % B |
By convention, variables in Python are given human-readable names that always start with a letter. The variable is typed into the IDE first, then assigned a value. Typically the first value will be assigned a value of some sort (int, float, string, or other) with an equals sign. Right now we are working with ints, or whole numbers and strings, or text. Table 2 provides examples of assignment operators using ints.
Table 2: Basic Python Assignment Operators
| Operator | Name | Read as/sounds like | Simple use case | Use case explanation |
|---|---|---|---|---|
| = | Equal | “Equals” | x = 1 | Sets x equal to 1 |
| += | Addition assignment | “Plus equal” | x = 1 x += 1 |
Initially sets x equal to 1, then adds 1 to x, so x = 2 |
| -= | Subtraction assignment | “Minus equal” | x = 1 x -= 1 |
Initially sets x equal to 1, then subtracts 1 from x, leaving 0. |
| *= | Multiplication assignment | “Times equal” | x = 2 x *= 3 |
Sets x initially to 2, then to 6 (2 * 3 = 6) |
| /= | Division assignment | “Divided by equal” | x = 10 x /= 5 |
x is initially equal to 10, then divided by equal to become 2 (10 / 5 = 2) |
To move through code, it is necessary to check whether variables meet conditions. This is done using comparison operators, outlined in Table 3.
Table 3: Basic Python Comparison Operators
| Operator | Name | Read as/sounds like | Simple use case | Use case explanation |
|---|---|---|---|---|
| < | Less than | “Is less than” | x < 3 | Checks to see if x is less than 3 (is x fewer than 3?) |
| > | Greater than | “Is greater than” | x > 4 | Checks to see if x is greater than 4 (is x more than 4?) |
| <= | Less than or equal to | “Is less than or equal to” | x <= 2 | Checks if x is less than or equal to 2 (is x 2 or fewer?) |
| >= | Greater than or equal to | “Is greater than nor equal to” | x >= 10 | Checks if x is greater than or equal to 10 (is x 10 or more?) |
| == | Is equal to^ | “Is equal to,” or “sets equal to” | x == 1 | Compares two values to check that they are equal, and/or sets a new value for a variable |
| != | Is not equal to^ | “Bang equal,” “is not equal to,” others | x != 3 | Compares two values to check that they are different |
Code Constructs and Explanations
Loops and Range
If the number of items to loop over is known, as in a list, set, or dictionary (these are all indexed and each item in the structure has a unique identifier that can be easily counted), a for loop can be used as-is. If the items to be iterated through are something like numbers, or sets of mismatched type objects (like the list [‘house’, 2, 3.5, ‘cat’], which is made up of strings and two types of number), use range to give the loop a starting place from which to iterate, or count, either up or down.
This counting is done with assignment operators, including += for counting, or iterating, up from a smaller number to a larger number; and -= for iterating down from a larger number to a smaller number (see Table 2).
Comparison operators (Table 3) “check” to see if a condition is true or false. If it’s true, then the statement proceeds. If it is false, specified alternate instructions will execute (e.g. else, break).
Coding Spiral Loop Beads
You may wish to move back and forth between the instructions for beading a spiral rope (and/or print out and refer to the PDF of instructions) as you read through the code blocks in this section.
In the following code, a beads and b beads are distinguished by color.
Code Block 2: Simplified while Loop For a Spiral Bracelet
#simplified while loop with no count back to reinsert
a_beads = 50
b_beads = 150
iteration = 1

while a_beads > 0 and b_beads >=3:
  print('iteration: ', iteration)
  print('a')
  a_beads -= 1
  for value in range(3):
    print('b')
    b_beads -= 1
  iteration += 1
print('Your while loop pattern is complete.')
The steps for Code Block 2 for a while loop are broken down as:
- Initialize the code before the while loop, starting with 50 a beads (variable “a_beads”) and 150 b beads (variable “b_beads”), with the iteration for the repetition set to 1.
- The while loop continues on the conditions that there are greater than 0 a beads and at least 3 b beads.
- Iteration (repeating the pattern) consists of:
- Printing the iteration number (a counter)
- Printing the a beads and decreasing the pool of a beads by 1
- Printing three b beads (using a variable of “value” for the range counter) and decreasing the pool of b beads by 3
- Incrementing the iteration counter up by one
- Completion happens when the loop conditions are no longer met, which means that there are a beads not greater than 0, and b beads not greater than or equal to 3, ending with a print statement of “Your while loop pattern is complete.”
Code Block 3: Simplified for Loop for a Spiral Bracelet
#simplified for loop including a break statement
a_beads = 50
b_beads = 150

for i in range(1, a_beads +1):
    if b_beads < 3:  #end the loop if there are fewer than 3 b_beads
        break
    print('iteration: ', i)
    print('a')
    a_beads -= 1
    for _ in range(3):
        print('b')
        b_beads -= 1

print('Your for loop pattern is complete.')
The steps for Code Block 3, a simple for loop with a break statement, are as follows:
- The numbers of a (a_beads) and b (b_beads) beads are defined as variables.
- The for loop is started, this time using i for iteration, as is more commonly seen in Python. The loop control statement conditions (in the parentheses) contains two conditions: a range of 1 to indicate that the loop moves in increments of one, and a_beads + 1 so the loop runs exactly the number of times there are a_beads (here it is 50). It could stop earlier if the condition(s) inside the loop were met.
- Inside the loop, first, the if statement is a condition check to see if there are fewer than 3 b_beads (or “if b_beads is less than 3”). If/when the condition is true, the loop breaks, which stops further iterations. This is an in-loop condition that would end the loop before the loop control statement condition of a_beads + 1 running 50 times were met, say, if there were fewer than 147 b_beads. Then:
- The current iteration number is printed
- “a” is printed to the terminal (or IDE) and a beads are decreased by 1
- A nested for loop runs three times using _ as a placeholder for a variable
- “b” is printed
- b_beads is decreased by 1
- The code is written for the pattern to continue as long as there are 3 b_beads for each a_bead. When done, it prints “Your for loop pattern is complete” to the terminal.
Table 4: Comparing the While and For loops (Code Blocks 2 and 3)
| While Loop (Code Block 2) | For Loop (Code Block 3) | |
|---|---|---|
| Loop control | Continues as long as the condition of a_beads > 0 is met. It is checked before each iteration. | Runs a fixed number of iterations, from 1 to the number set by the variable a_beads outside the loop (up to and including 50). Inside the loop, b_beads < 3 is checked and the loop breaks if the condition is true. |
| Iteration variable | We used iteration the first time the concept was introduced | This time we used i, which is standard in Python programming |
| Loop dependencies | The while loop depends on variables of counts for a_beads, b_beads, and the iteration value of 1 defined before the loop begins. | The for loop depends on defined variables a_beads and b_beads, and relies on the conditions in the parentheses (1, a_beads + 1) |
| Loop termination | Terminates when a_beads is not greater than 0, or when b_beads is less than 3. | Terminates after a_beads iterations (50), or will break early if b_beads is less than 3. |
Pseudocode and Code
Pseudocode, a way of informally writing out actions, objects, and conditions, can help you think through your code. It can be used to translate a new idea into code, or to translate existing code into something that is more human understandable.
If you’re starting from scratch (meaning nothing, not the block-based programming language named Scratch), pseudocode can be used to outline each of the things that your code needs to do. If you already have the code, try breaking it down into English to better understand what it does. As mentioned above, we’ve provided a downloadable and printable PDF of the instructions to practice writing out pseudocode and code with instructions for the bracelet.
Learning pseudocode and translating it to code with a manipulative (in this tutorial, a beaded bracelet) gives students a point of reference and helps to keep abstract ideas concretized, visible, and workable as they learn to express the concepts (Upah & Thomas, 1993).
Spiral Bead Bracelet Instructions
Table 5: Key for symbols used in spiral bracelet instructions
| Symbol | Definition |
 |
A zigzag, used to indicate the thread has been truncated for the purpose of the diagram |
 |
Bead a (speckled) |
 |
Bead b (white) |
Table 6: Step-by-step instructions for creating a spiral rope
| Step | Diagram | Instructions |
|---|---|---|
| 1 | 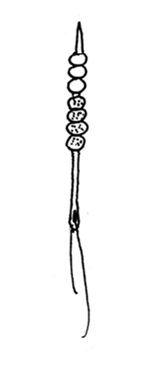 |
Take four a beads and three b beads and thread them onto a needle, then pull them down the thread. Leave a tail of about 8” |
| 2 | 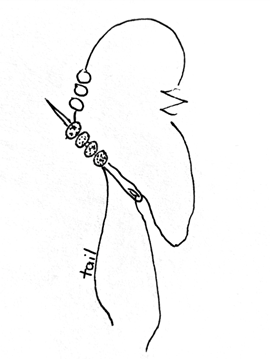 |
Re-thread the needle through the first four beads (the a beads) in the direction they were first threaded, forming a loop with the thread |
| 3 | 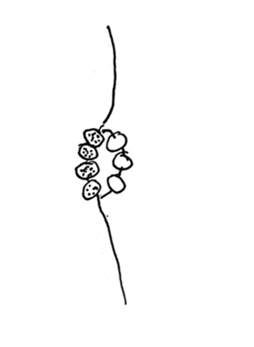 |
Pull the loop closed |
| 4 | 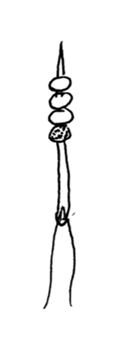 |
Pick up one a and three b beads on the needle |
| 5 | 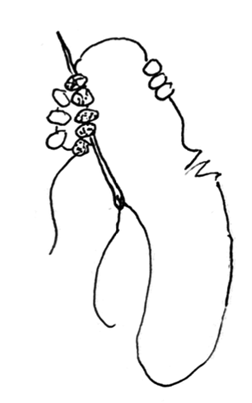 |
Count back three a beads. If the a beads were numbered A1, A2, A3, A4, then the a bead added in the previous step is A5. Insert the needle into the second bead, A2, in the same direction (away from the beginning), and thread the needle through A2, A3, A4, and A5. This makes another bead loop for the spiral |
| 6 | 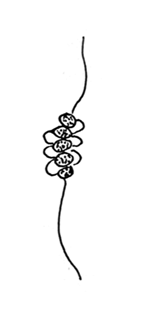 |
Pull the loop closed |
| 7 | 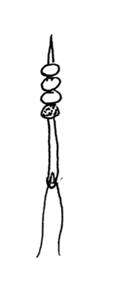 |
Place one a bead and three b beads onto the needle. This is the same as Step 4. |
| 8 | 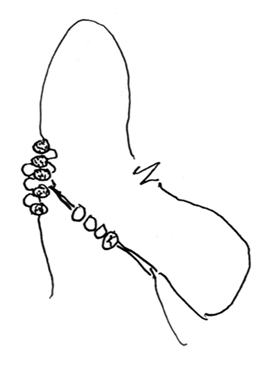 |
Count back three beads from the end of the project, and insert the needle into bead A3, continuing through A4, A5, and A6 |
| 9 | 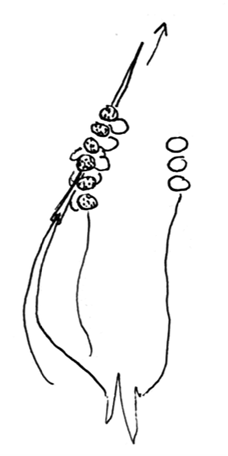 |
Pull the needle through beads A3, A4, A5, and A6, adjusting the tension of the thread as needed. Note where this set of b beads landed. It should be on the opposite side of the second set of b beads to create the spiral. Whichever direction (left or right) your spiral is going, that is the direction you will continue in |
Adding a Button and Loop Clasp
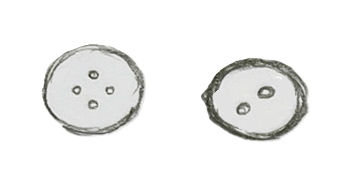
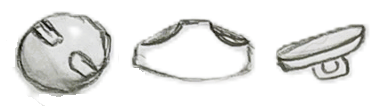
There are two styles of button that can be used for a clasp: one with holes through the button’s face, and one with a shank—a loop attached to or integrated into one face. Round or oval buttons are the easiest and best choice for this project, at least 8mm in diameter (see Figures 2 and 3).
A large, round bead is also an appropriate choice.
Attach the button or large bead
Either use the remaining length of thread or attach a new piece by passing through the core beads of one end of the bracelet. String two or three core beads to create enough slack to allow the button to move freely. Regardless of button type, don’t pull the thread very tight, as doing so will make the bracelet more likely to break with wear. Follow the instructions appropriate to the button type you’re using.
Two-hole buttons
First stitch up through one hole and down through the other, then work down into the core of the spiral and back up to the button (Figure 4). Repeat several times to reinforce, as this is the weakest point of the bracelet (Figure 5).
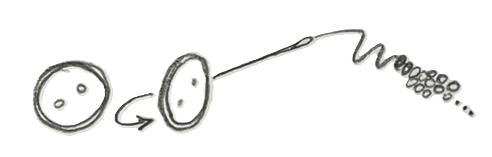
Four-hole buttons
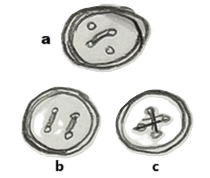
A four-hole button is done similarly to a two-hole button, but either choose to use only two of the holes on a diagonal (a), or switch which holes to pass through on each reinforcing pass, forming either two parallel lines (b), or an X (c) as in Figure 6.
Embellishment
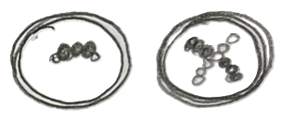
Two- and four-hole buttons can be embellished by picking up beads to cover the thread on the first pass over the top face of the button, then passing back through those beads while reinforcing. If chosen, this must be done before creating the loop to ensure the loop will be made big enough to pass over both the button & embellishment (Figure 7).
Buttons with Shanks
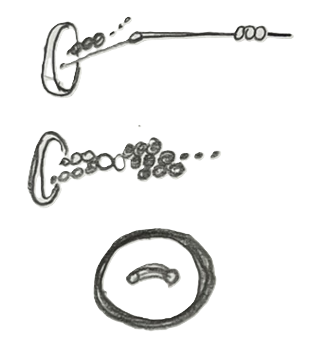
To use a button with a shank, pick up a few beads to give the button some movement independent of the bracelet. Pass through the shank, then pick up the same number of beads present on the other side of the button (Figure 8).
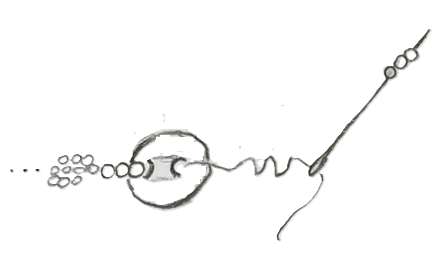
Pass the needle and thread back down through the core beads and into the spiral (Figure 9).
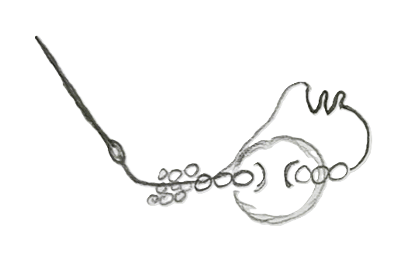
Work the needle back up to the button, pass it through the shank, and repeat several times until the button feels securely attached to the bracelet (Figure 10). If at any time the needle feels too tight in the beads, it’s time to stop because it is possible to break beads.
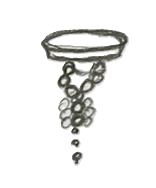
Creating the loop for the clasp
Creating a loop for the clasp that stays closed will take some trial and error (or iteration, if you’ve followed the rest of the article). To begin, pick up some beads with your needle and check them against the size of your button or larger bead. A length of beads a few beads longer than twice the diameter of the button, indicated with d in Figure 11, is a good starting point. You will likely need a couple more beads than 2 * d, but this will vary based on a number of factors (see discussion below).
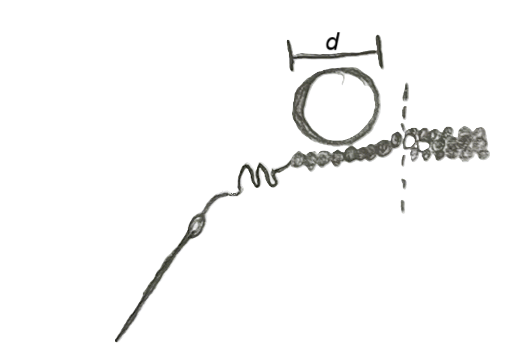
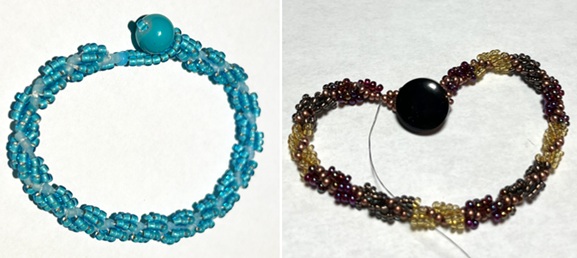
Figure 12 shows two bracelets. The one on the left, in light blue Toho brand Japanese size 11 beads, has a 9mm blue bead for a clasp bead attached by an additional size 11 bead to hold the clasp bead on. The loop for this bracelet consists of eighteen Toho beads. The bracelet on the right, done in browns, uses 11/0 Miyuki brand rocailles (rounds) with a 12mm shank button. The loop for the brown bracelet uses twenty-four Miyuki rocailles. While both Toho and Miyuki are Japanese-made bead brands, Toho 11/0 beads are slightly taller than Miyuki 11/0 beads. This matters when counting beads for a clasp because the length of a set number of beads will vary across brands for the same size bead, and even finishes within the same brand.
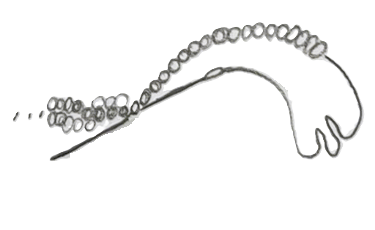
Pass the needle back through the first bead to form a loop that fits around the widest point of the button (Figure 13). Test it; if the loop is too large to hold the bracelet closed or too small to fit over the bead, undo the loop and add/remove beads as necessary.
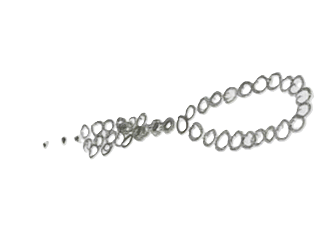
Once the fit is correct, pass the thread through all of the beads several times to reinforce the loop, then pass it back down through the core of the spiral rope to hide the tail before trimming the end of the thread (Figure 14).
Conclusion
While this is just one example of using a manipulative to illustrate and make programming concepts tangible, this project uses a technique that that is relatively quick and easy to learn and results in an attractive product. The project may make the technical aspects of Python seem more accessible, fun and appealing to audiences who would not otherwise be drawn to the topic. A workshop using these materials will be relatively inexpensive, require only a one- to two-hour commitment from participants, and be appropriate to incorporate in a schedule with other technical and crafting library programming.
References
Bers, M. U., & Resnick, M. (2015). The official ScratchJr book: Help your kids learn to code. No Starch Press.
Binary Bracelets. (N.D.). Code.org. https://code.org/curriculum/course2/14/Teacher
Rusk, N. & Massachusetts Institute of Technology Media Laboratory. (2017). Scratch Coding Cards: Creative Coding Activities for Kids. No Starch Press.
Upah, S., & Thomas, R. (1993). An Investigation of Manipulative Models on the Learning of Programming Loops. Journal of Educational Computing Research, 9(3), 397–412.
Sweigart, Al. (2021). The Big Book of Small Python Projects: 81 Easy Practice Programs. https://inventwithpython.com/bigbookpython/.
Yang, L. (2020). How to Make a Spiral Bead Rope. The Spruce Crafts: Create, Craft, Collect. https://www.thesprucecrafts.com/easy-spiral-bead-rope-3877148
Appendix
The spiral effect requires the length of each core section to differ from that of the groups of outer beads, but this can be accomplished in a variety of combinations with different effects. Some ideas to spark exploration are provided in Appendix Table 1.
Appendix Table 1: Spiral Ropes with Variations in Bead Sizes and Counts
| Core (a) | Outer (b) | Count/Ratio | |
|---|---|---|---|
| 11/0 (pictured) same size, count variation |
11/0 (pictured) same size, count variation |
4 color a : 3 color b* | 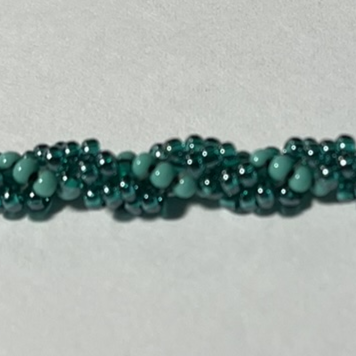 |
| 11/0 (pictured) same size, count variation |
11/0 (pictured) same size, count variation |
3 color a : 2 color b | 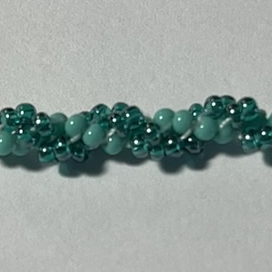 |
| 8/0 | 10/0 | 4 a : 5 b | 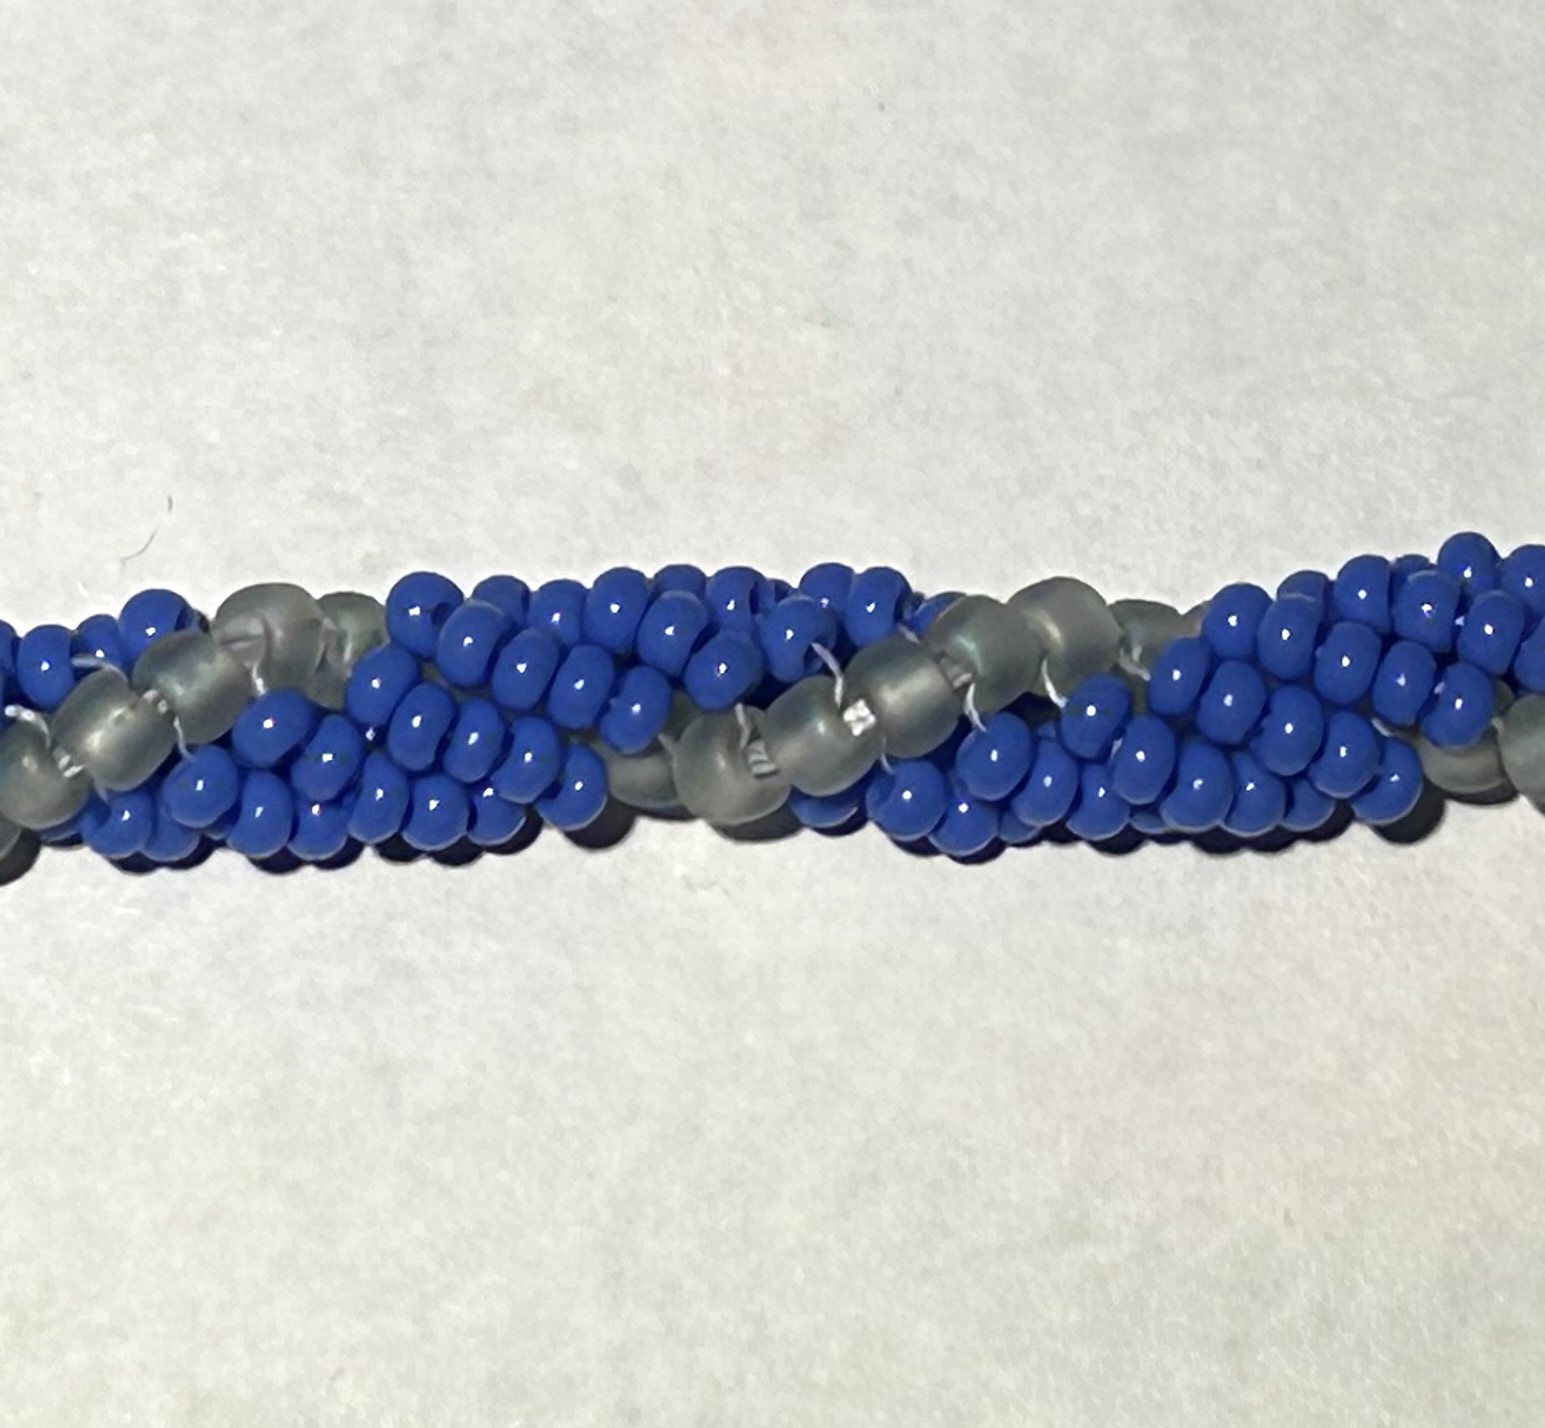 |
| 8/0 | 11/0 | 4 a : 4 b | 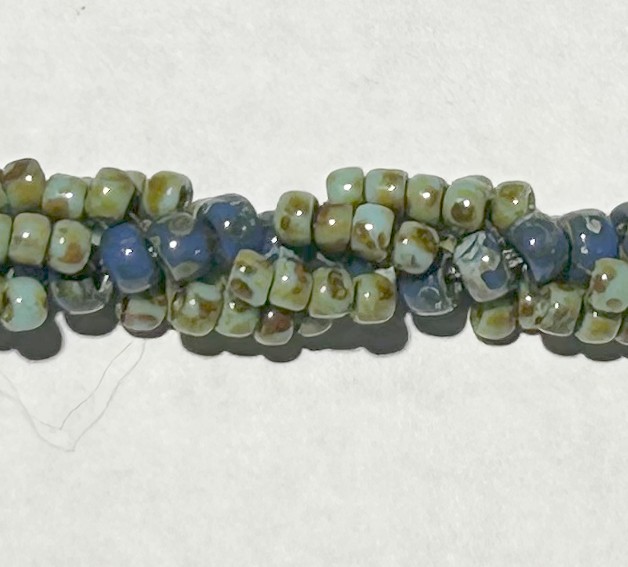 |
| 6/0 | 8/0 | 4 a : 4 : b | 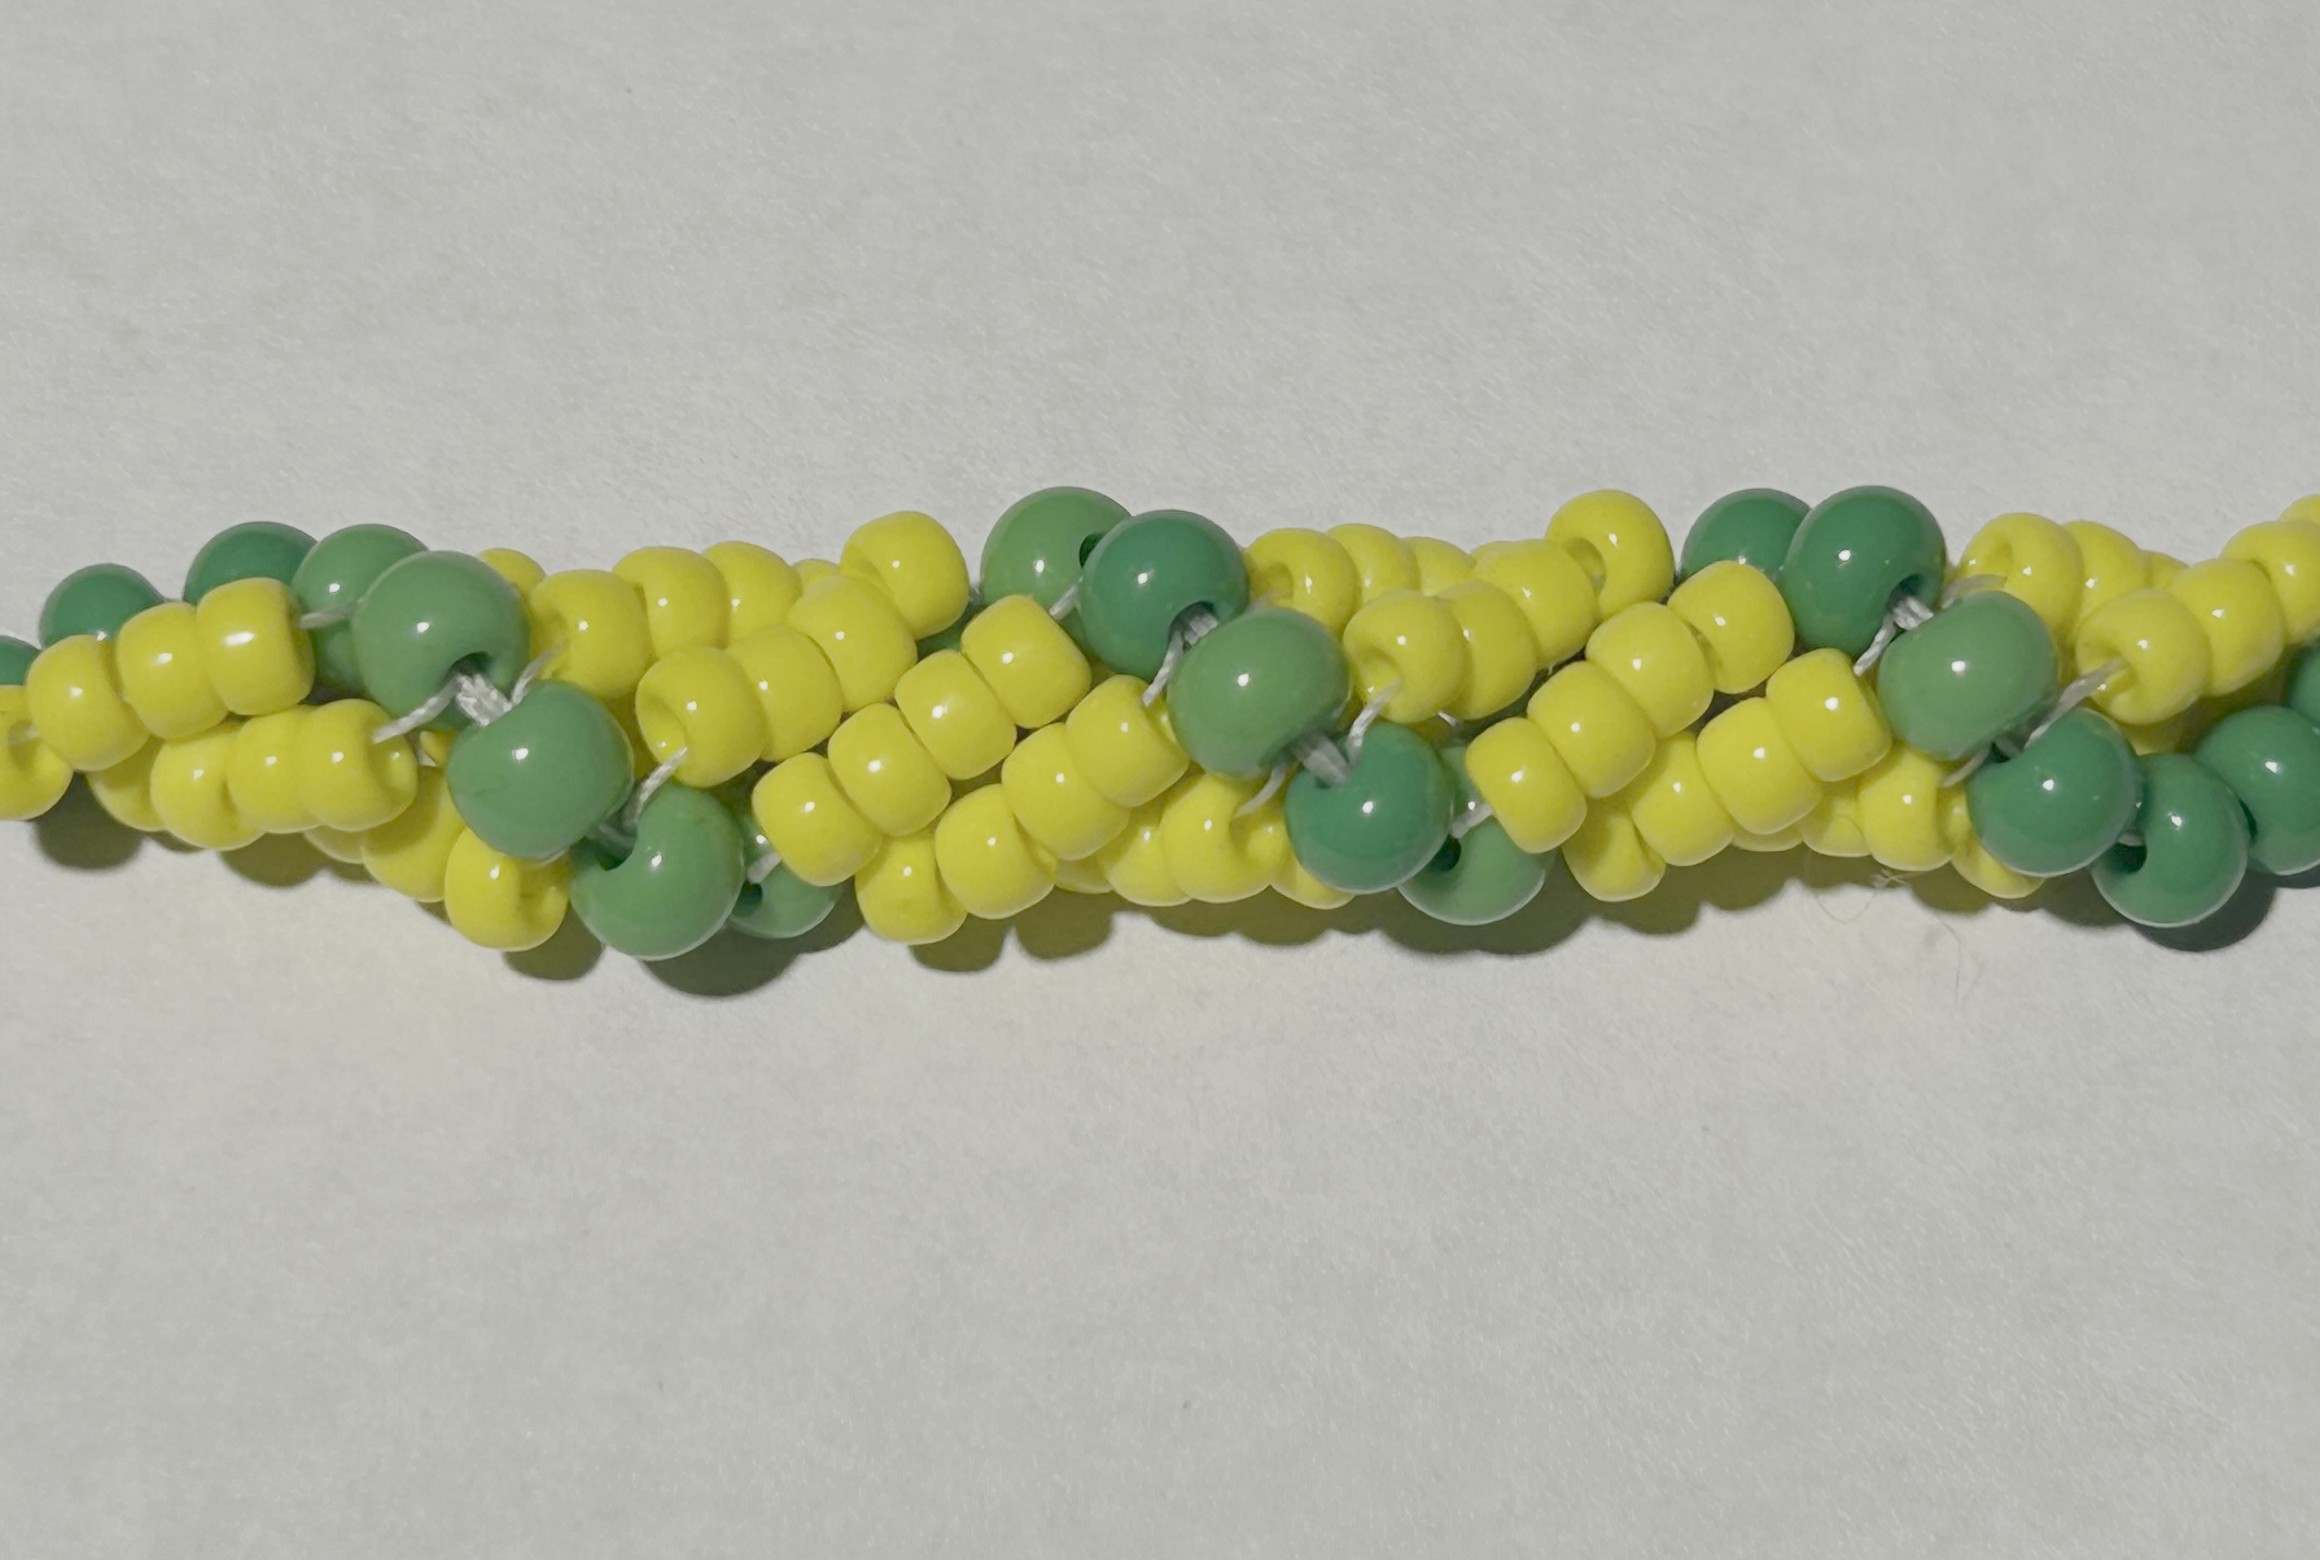 |
*This is the “standard” ratio used in the directions for the spiral bracelet in the code
